

Some applications will be nice to see if we implement navigation drawer functionality. Navigation Drawer is the most frequent functionality supplied by Android.
The navigation drawer is a UI panel that displays your app’s main navigation menu, It is also a crucial UI feature that delivers activities that users prefer,
such as changing user profiles, altering application settings, etc.
In this tutorial, we’ll go over how to construct the navigation drawer in Android using Kotlin language.
The navigation drawer appears when the user swipes a finger from the activity’s left edge.
They can also find it by touching the app symbol in the action bar from the home activity.
Let’s Start :)
Step 1 — Creating a menu in the menu folder
Create menu directory under the resource directory and create a menu.xml file as below.
Below xml code for creating menu as below
- Home
- Settings
- Share
- Options
- Services
- About us
- Contact US
menu.xml

<?xml version="1.0" encoding="utf-8"?>
<menu xmlns:android="http://schemas.android.com/apk/res/android"
xmlns:tools="http://schemas.android.com/tools"
    tools:showIn="navigation_view">

  <group android:checkableBehavior="single">
      <item
            android:id="@+id/home"
            android:title="Home"/>
      <item
            android:id="@+id/settings"
            android:title="Settings"/>
     <item
            android:id="@+id/share"
            android:title="Share"/>
 </group>

 <item android:title="Options">
      <menu >
      <group android:checkableBehavior="single">
        <item
                android:id="@+id/home1"
                android:title="Services"/>
         <item
                android:id="@+id/settings1"
                android:title="About US"/>
         <item
                android:id="@+id/share1"
                android:title="Contact US"/>
      </group>
  </menu>


</item>
</menu>
Step 2— Creating a Layout for our nav Header (Optional)
Create a nav_header.xml file under layout directory as below. You can modify according to your requirements.
<?xml version="1.0" encoding="utf-8"?>
<androidx.constraintlayout.widget.ConstraintLayout
    xmlns:app="http://schemas.android.com/apk/res-auto"
    xmlns:tools="http://schemas.android.com/tools"
    android:layout_width="match_parent"
    android:background="@drawable/zentechbytes"
    android:layout_height="150dp"
    xmlns:android="http://schemas.android.com/apk/res/android">


<TextView
        android:id="@+id/textView"
        android:layout_width="wrap_content"
        android:layout_height="38dp"
        android:layout_marginEnd="16dp"
        android:text="@string/zen_tech_bytes"
        android:textSize="30sp"
        android:textStyle="bold"
        android:textColor="@color/white"
        app:layout_constraintEnd_toEndOf="parent"
        tools:ignore="MissingConstraints"
        tools:layout_editor_absoluteY="16dp" />


</androidx.constraintlayout.widget.ConstraintLayout>
Step 3 — Working with the activity_main.xml file
To set up the fundamental things needed for the Navigation Drawer, change parent from ConstraintLayout-> DrawerLayout
activity_main.xml

<?xml version="1.0" encoding="utf-8"?>
<androidx.drawerlayout.widget.DrawerLayout
    xmlns:android="http://schemas.android.com/apk/res/android"
    xmlns:app="http://schemas.android.com/apk/res-auto"
    xmlns:tools="http://schemas.android.com/tools"
    android:id="@+id/drawerLayout"
    android:layout_width="match_parent"
    android:layout_height="match_parent"
    tools:context=".MainActivity">

<androidx.constraintlayout.widget.ConstraintLayout
    android:layout_width="match_parent"
    android:layout_height="match_parent">
   <FrameLayout
        android:id="@+id/frameLayout01"
        android:layout_width="match_parent"
        android:layout_height="match_parent"/>
</androidx.constraintlayout.widget.ConstraintLayout>

<com.google.android.material.navigation.NavigationView
    android:id="@+id/navView"
    android:layout_width="match_parent"
    android:layout_height="match_parent"
    android:fitsSystemWindows="true"
    android:layout_gravity="start"
    app:headerLayout="@layout/nav_header"
    app:menu="@menu/nav_menu"/>


</androidx.drawerlayout.widget.DrawerLayout>
Step 4 - Creating Fragments
Create Fragments if required. In this example we are creating two fragments only to show. You can create as your design demanding.
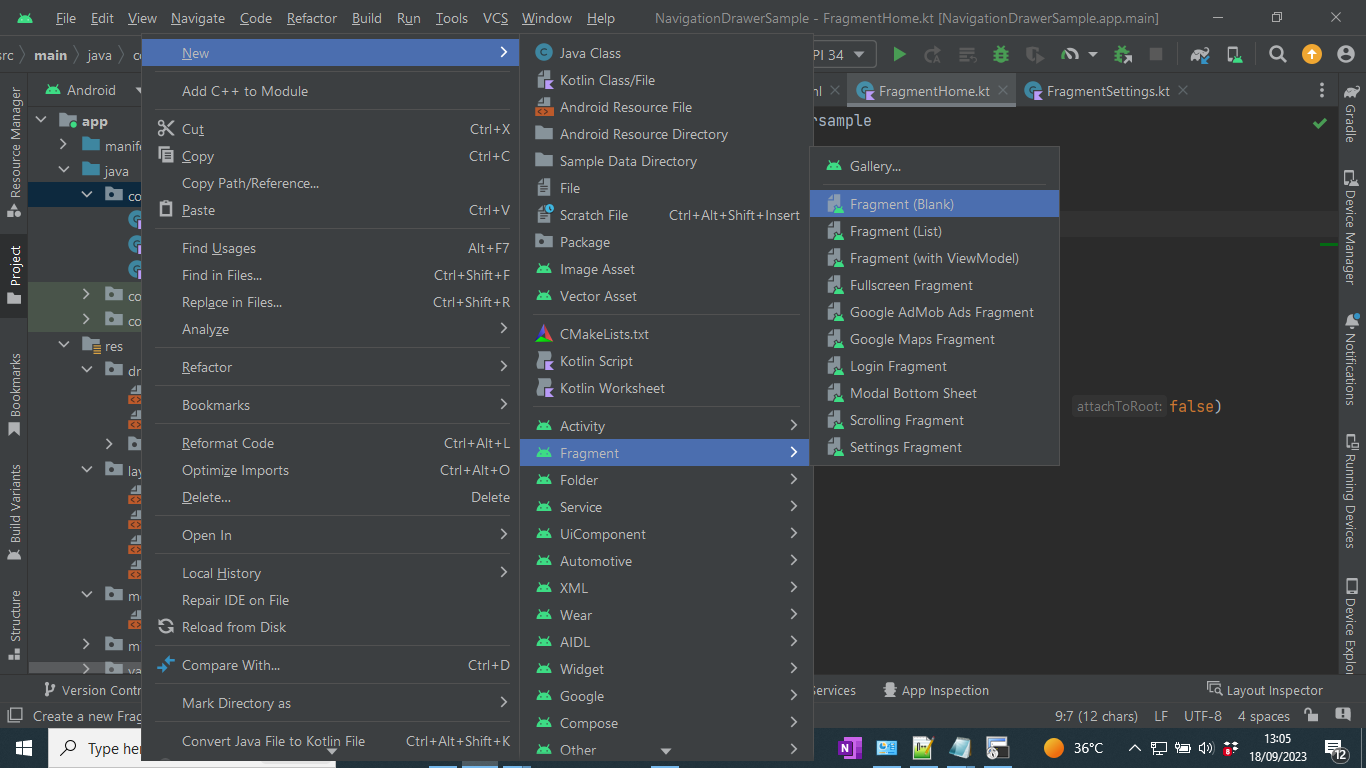
It will create both xml file and kotlin files.
fragment_home.xml

<?xml version="1.0" encoding="utf-8"?>
<FrameLayout xmlns:android="http://schemas.android.com/apk/res/android"
    xmlns:tools="http://schemas.android.com/tools"
    android:layout_width="match_parent"
    android:layout_height="match_parent"
    android:background="#715aad"
    tools:context=".FragmentHome">

  <!-- TODO: Update blank fragment layout -->
   <TextView
        android:layout_width="match_parent"
        android:layout_height="match_parent"
        android:gravity="center"
        android:textSize="31sp"
        android:textColor="@color/white"
        android:text="@string/hello_blank_fragment" />

</FrameLayout>
FragmentHome.kt

package com.zentechlab.navigationdrawersample

import android.os.Bundle
import androidx.fragment.app.Fragment
import android.view.LayoutInflater
import android.view.View
import android.view.ViewGroup

class FragmentHome : Fragment() {

    override fun onCreateView(
        inflater: LayoutInflater, container: ViewGroup?,
        savedInstanceState: Bundle?
    ): View? {
        // Inflate the layout for this fragment
        return inflater.inflate(R.layout.fragment_home, container, false)
    }


}
Create as many Fragments required for your project as above.
Step 5 - Coding
Its the time to code for navigation drawer.
MainActivity.kt
package com.zentechlab.navigationdrawersample

import androidx.appcompat.app.AppCompatActivity
import android.os.Bundle
import android.view.MenuItem
import androidx.appcompat.app.ActionBarDrawerToggle
import androidx.drawerlayout.widget.DrawerLayout
import androidx.fragment.app.Fragment
import com.google.android.material.navigation.NavigationView

class MainActivity : AppCompatActivity() {
    lateinit var toggle: ActionBarDrawerToggle
    lateinit var drawerLayout: DrawerLayout

    override fun onCreate(savedInstanceState: Bundle?) {
        super.onCreate(savedInstanceState)
        setContentView(R.layout.activity_main)
        drawerLayout = findViewById(R.id.drawerLayout)

        toggle =
            ActionBarDrawerToggle(this@MainActivity, drawerLayout, R.string.open, R.string.close)

        drawerLayout.addDrawerListener(toggle)
        toggle.syncState()

        supportActionBar?.setDisplayHomeAsUpEnabled(true)

        //Functionality for the Drawer items
        val navView: NavigationView = findViewById(R.id.navView)
        navView.setNavigationItemSelectedListener {
            it.isChecked = true
            when (it.itemId) {

                R.id.home -> {
                    replaceFragment(FragmentHome(), it.title.toString())
                }

                R.id.settings -> {
                    replaceFragment(FragmentSettings(), it.title.toString())
                }

            }
            true

        }
    }

    //Function Area
    private fun replaceFragment(fragment: Fragment, title: String) {
        val fragmentManager = supportFragmentManager
        val fragmentTransaction = fragmentManager.beginTransaction()
        fragmentTransaction.replace(R.id.frameLayout01, fragment)
        fragmentTransaction.commit()
        drawerLayout.closeDrawers()
        setTitle(title)

    }

    override fun onOptionsItemSelected(item: MenuItem): Boolean {
        if (toggle.onOptionsItemSelected(item)) {
            return true
        }
        return super.onOptionsItemSelected(item)
    }
}
Run the project and see how the navigation project is working.
Thank You.